
Cowabonga Dudes!
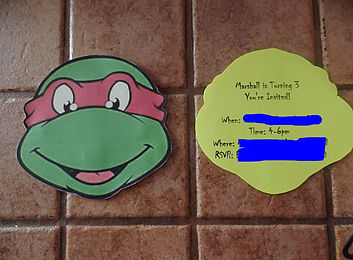
Here are free instructions with pictures/links and free printables for your own DIY TMNT Party. I had lots of compliments and fun with this one!

DIY TMNT Invitations
Materials
-
green cardstock
-
scissors
-
double-side tape (or stick glue)


Trace the Ninja Turtle heads on each party info. Each Ninja Turtle heads are shaped differently - Be sure to trace each of the 4 heads out for proper fitting.
Use double-sided tape (or glue stick) and place on the back of the Ninja Turtle Heads. I used sunlight to find the proper positioning of the head to the party info before sticking it together. Cut party info out.


Cut invitation out. Be sure to cut off extra trimmings.
There should be 4 head Ninja Turtle heads so print out invitations accordingly.


DIY TMNT Balloon Wreath
Materials
Styrofoam ring (I used 17")
Blue, Green, Red, Orange 9" balloons (80+ I used)
Greening pins (70+ I used)


Grab a ballon + greening pin and pierce through balloon (about mid-way).
When piercing the styrofoam ring, I suggest adding balloons to the same pin to save - I added 3-4 balloons at a time.
Be sure to squeeze the pin when piercing the styrofoam.


Continue along the front & sides of the ring.
Fill in any necessary spaces.
You do not have to do both sides incase it will be showing.


DIY TMNT
Loop Bags
Materials
-
green paper loop bags
-
TMNT colours streamers
-
large googly eyes
-
double-sided & scotch tape
-
scissors


Line your streamers against the loop bag and roughly cut. Use the scotch tape and apply streamer.
Trim remaining streamer, leaving extra streamer on the left side with a slight slant for effects.
Use your double side tape and add the googly eyes.
Materials
9" green paper cups
TMNT colours for ribbion
Med-Large googly eyes
Double-sided tape

DIY TMNT
Cups
Grab your ribbion and wrap 2/3 of the way up around the cup, use the double-sided tape.
Trim excess ribbion. Use double-sided tape and attach googly eyes.


DIY TMNT Birthday Banner
Here is the ODF downloadable document for a DIY TMNT 'Happy Birthday' Banner. I also left a blank background page so you can add your little one's name for extra personalization :)
Copy & Paste the blank background and add your childs name!
You may have to play around with the lettering and placement but if you have any troubles, leave a comment or join our mailing list and I can assist you further. Enjoy!
The photo of the birthday banner and backdrop was taken much later into the party! Balloons came down along with streamers and the string banner was played with a few times!! It looked much better at the start, hahah!


Steps to Create Banner
-
Cut out banner letters. Hole punch two holes at the top of both sides of each letter.
-
Grab the remaining DIY TMNT Plates and hole punch on both sides in the middle.
-
Grab your yarn and string in two plates then string through the letter starting with 'HAPPY'. Dont forget to put two plates on the end of 'BIRTHDAY'.
-
If you decided to personalize a name, repeat steps 1-3.
* I used thumb tacs to pin plates to bullet board. It is rather heavy with the plate decor.
DIY TMNT
Plate Decor

Materials
9" green plates (dessert plates)
hole punch
double-sided tape
ribbon (for hanging purposes)
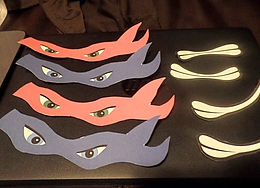
Click the PDF files to download free TMNT mask templates (2 separate files)


For this particular craft, I used three plates for hanging decor and used 4 more to add at the end of the birthday banner. Let's get started!
Print and cut out templates. Use double-sided tape and add the mouth & mask.
The 4 needed for the birthday banner will need one punch-hole mid-way on the left & right sides of the plate.


